Saturday 31 August 2013

Orly Black MegaPixel FX Review + Nail Art

Hey everyone! Today I have another review for you (I have a lot to get through), using the new Orly Black MegaPixel FX polish*, but this time I've included a bit of nail art. I'm actually really proud of these nails and I kept them on for a whole 3 days! Hopefully you will like them as much as I do. There's quite a few pictures in this post so I'm going to put them after the jump.

Thursday 29 August 2013

Models Own Ice Neon Nail Art

Hey everyone! Here's the promised second post of today, this time a review of some gorgeous Models Own Ice Neon shades*. I know these aren't new shades but I wanted to review them for you anyway. I've also included some of the gorgeous new pastel studs* from Born Pretty Store for a bit of contrast. 


This was an idea that I'd had in my head for quite a while but it didn't turn out at all like I'd imagined and I was quite disappointed, but nevertheless I do kind of like the effect. These were a heck of a lot brighter in person but as always it was difficult to capture properly on camera. 


This was one coat of both Luis Lemon* and Toxic Apple* over white, I originally tried applying them on their own but they were way too sheer and it was just getting too thick, and I think the effect over white is much brighter anyway. 


If you like the look of the studs* you can buy them here in shades #3 and #8
What do you think? Let me know in the comments!
Alice

*some of the products in this post were provided to me for review but all opinions are entirely my own

Rococo Nail Varnish Swatches and Review

Hey everyone! Once again I'm behind on blogging, I've had this waiting to post for days now and I just haven't got around to finishing it, so today I'm going to be posting twice! First post of today is a review of some wonderful Rococo creme polishes. I'd never tried Rococo before this and I'm really impressed. The colours I received were not only gorgeous but amazing quality, and definitely worth getting if you haven't already. Full review will be after the jump

Sunday 25 August 2013

Exciting news!

Hey everyone! Sorry for not posting for a few days, but today I have some exciting news. Next month, I will be the featured nail artist for Scratch nail wraps! This is probably one of the (if not the) most exciting projects I've been part of since starting my blog and I'm incredibly excited for September to begin. My wraps will become available on September the 3rd, but you can pre-order the monthly mani box now here. That includes all 3 wraps (which you can see in the images below) and a bunch of other goodies, including a nail polish, studs, nail file and a secret addition, which even I don't know about! If you like the sound of that you can order it here before the 31st August for just $25


The three designs I will be including are:
-  My Scrabble Love nails, but rather than having a nude background it's translucent and you are therefore able to include any colour you wish underneath, including the colour in the Monthly Mani box. 
- My owl nails which you can see here, these are some of my favourite nails that I've ever created and I'm so excited that you can now all have this design too!
- My floral stud nails. Of course the studs can not be part of the wrap, so they are included in the Monthly Mani box instead.


I really hope that you're all as excited about this as I am. If you would like the monthly mani box you can sign up for it here for just $25 before the 31st August. Or if you like the look of just a single nail design, they will be available on the Scratch website on the 3rd September 

Let me know what you think in the comments!
Alice

*All photos are the property of Scratch

Tuesday 20 August 2013

Digital Dozen Does Fashion: Day 5

Hey everyone! Today I have the final post of the digital dozen does fashion week today, albeit a day late. It was inspired again by a La Moda bag, this* one, which is currently on sale!


For these I used a base of Barry M - Green Berry, and Barry M Gold Foil Special Effects, then I used striping tape from MASH and MASH Black polish. Then I used drops of Seche Vite to add the studs, and then topped off all nails with Seche Vite. 


What do you think? Let me know in the comments
Alice 

*some of the products in this post were provided to me for review but all opinions are entirely my own 

Friday 16 August 2013

Digital Dozen Does Fashion: Day 4

Hey everyone! First of all I just wanted to announce that the giveaway winner has been chosen and contacted, and she has replied. Nail Girl's will announce her name on their Facebook page in the next few days I think. Anyway, I'm really sorry I didn't post last night, I was just too tired. I'm so happy to have a day off tomorrow! Day 5 will be tomorrow, and my very delayed 'which is best' for matte top coats will hopefully be Sunday so there's quite a bit coming up in the next few days. 

Today's post is based on another La Moda satchel, which has unfortunately sold out in this particular colour, but this is similar for those who fancy it.


The base of this is MASH - White, the nude is Butter LONDON Cuppa, the red is Jacava - Crimson Crush and the black is acrylic paint.


I decided to again mix the outside and the inside into one design, but it took me quite a while to work out how. This design was actually a bit of an accident because I had originally intended to post my nails fully with Cuppa but I forgot and painted them all with white and had to improvise! Nevertheless, I'm really happy with how it came out!


What do you think? Let me know in the comments!
Alice

*some of the products in this post were provided to me for review but all opinions are entirely my own

Wednesday 14 August 2013

Digital Dozen Does Fashion: Day 3

Hey everyone! Another quick post so I can go to sleep tonight, but today's fashion inspiration isn't THAT closely related to the nails. I was loosely inspired, but hopefully you can still see where I was coming from.  I have quite a few photos so I'll put the rest after the jump


Tuesday 13 August 2013

Digital Dozen Does Fashion: Day 2 (and GIVEAWAY)

Hey everyone! I'm not going to write much today because I have to be up in 6 hours for work. I'm beginning to regret this week's digital dozen, I've only just started a full time job and I'm struggling to find the time to post twice a week, let alone once a day for 5 days! But I shall soldier on ;) 

Today's nails are based on this* jumper from Romwe, who have kindly offered to sponsor a giveaway for my blog. More information on that at the end of the post, first up: the nails!


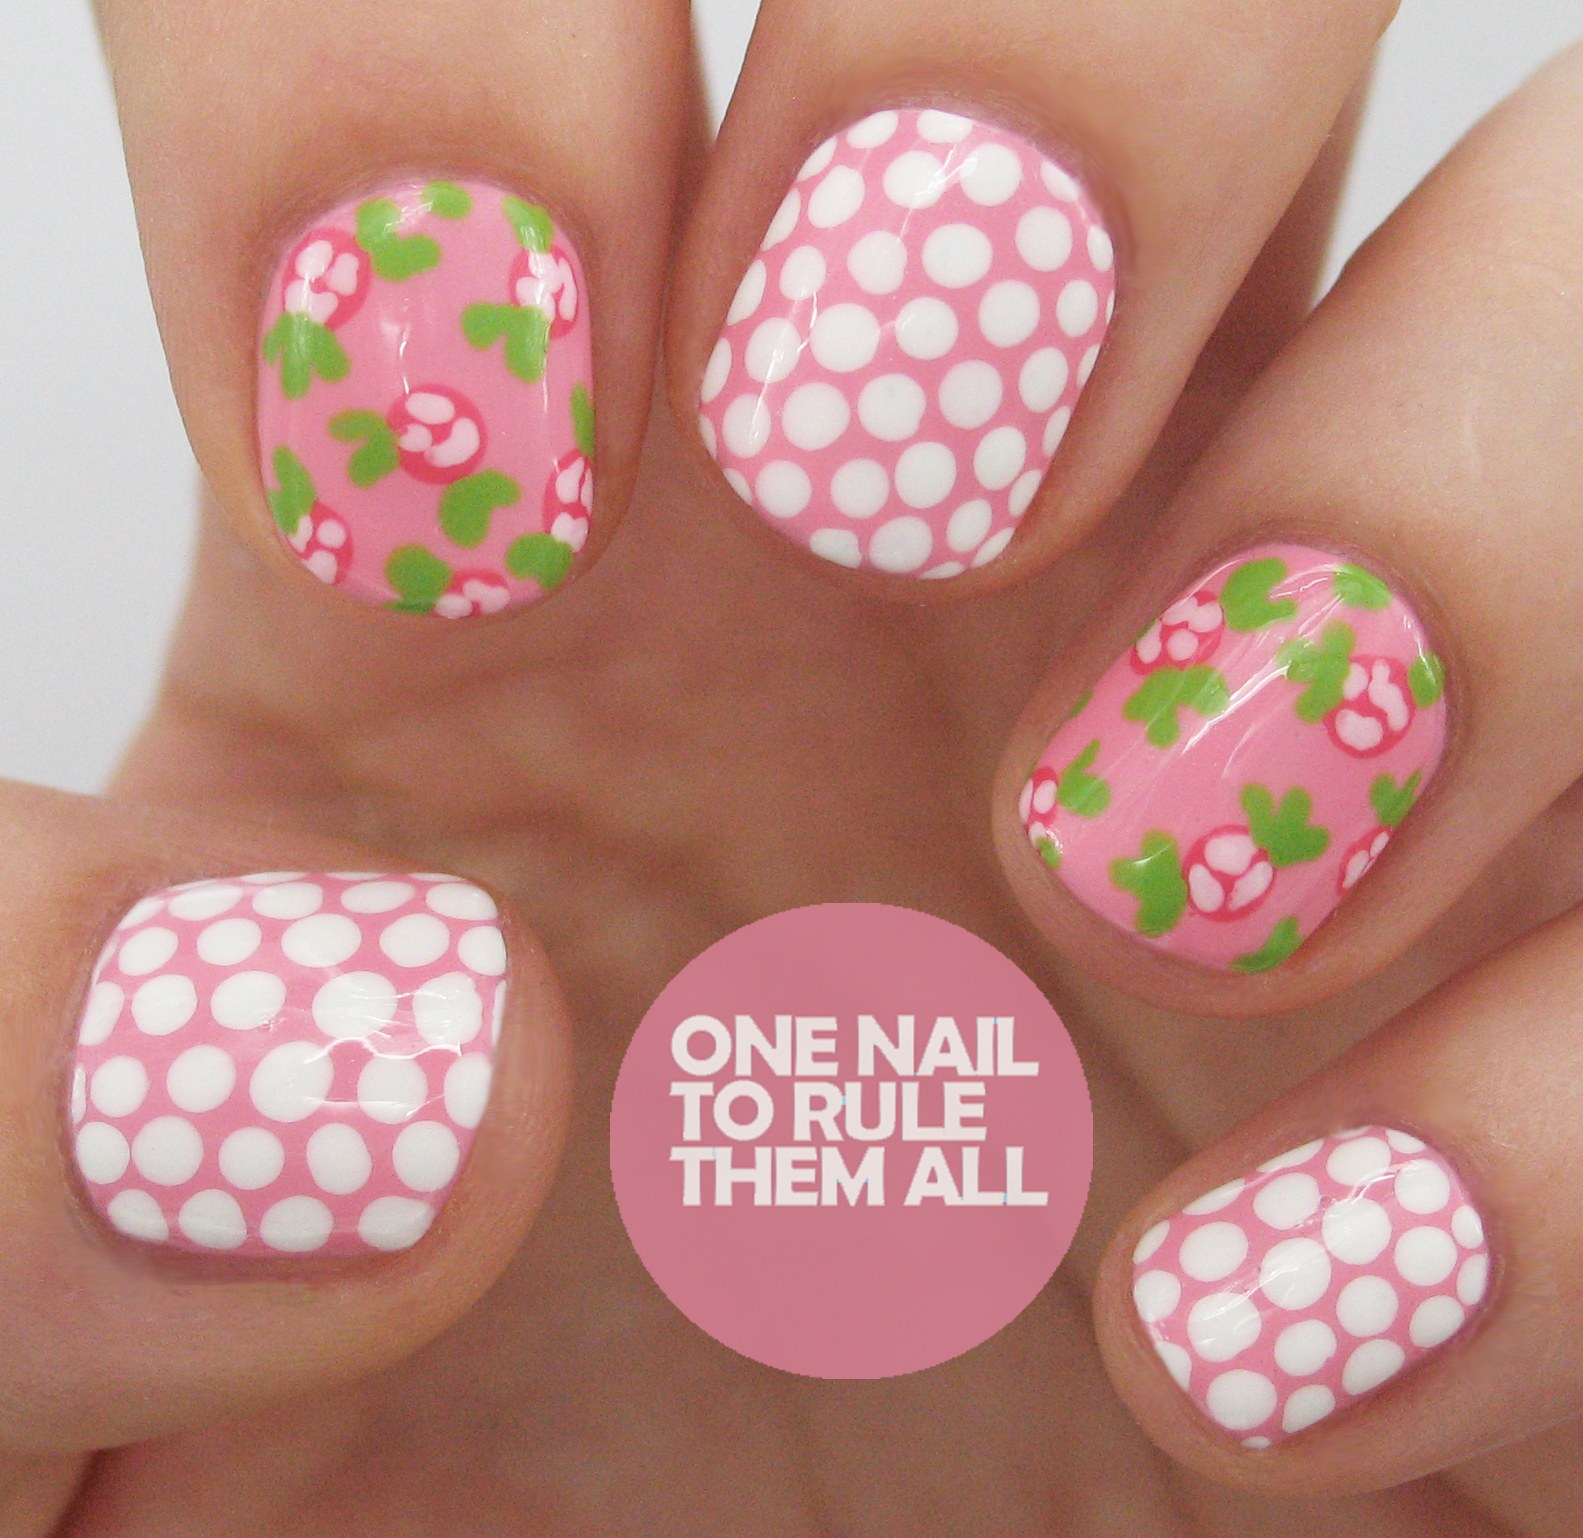
The jumper design is a simple gradient, and as I was in a rush I felt it best not to over-complicate that. However, I do quite like the look of the gradient alone, even if it seems a bit boring for my taste. 

The colours are Butter LONDON - Cuppa and Essence - Stuck on You, topped off with a coat of Seche Vite. 


As I only received this top yesterday, I didn't have time to take a picture of me wearing it or of it in full, so for a full picture see the website here. I promise you it's worth the look! I absolutely love this jumper and I will certainly be wearing it a lot, especially as the British summer seems to have ended already

Now for the giveaway! Romwe.com have kindly offered to give away this dress and this dress to one lucky reader. All you have to do is enter using the Rafflecopter widget below. It is open internationally

a Rafflecopter giveaway

For those of you who cannot wait, or don't wear dresses, Romwe currently have a sale on back to school clothes here, or you can visit their website here

What do you think? Let me know in the comments!
Alice

Additionally, if you have time, I would super appreciate it if you could vote for me for 'Best New Beauty Blog' in the Cosmopolitan Blog Awards 2013 here

*Some of the products in this post were provided to me for review but all opinions are entirely my own and were not influenced in any way 

Monday 12 August 2013

Digital Dozen Does Fashion: Day 1

Hey everyone! I'm back with another week of digital dozen posts for you. I unfortunately missed July but hopefully I'll be able to keep up with this week's post. I've just started a new job though so I might dwindle later in the week but we shall see. I apologise in advance if that does happen! 

So for the first day I'm bringing you some nails inspired by this* gorgeous La Moda satchel. I'm going to put the rest of this post after the jump because it's going to be a pretty long on.


Saturday 10 August 2013

Different but the same

Hi everyone! I'm sorry it's been a while since I posted, I tried to post this last night but the internet just would not work and I was super tired so I decided to call it a night. Last week I received an amazing bundle of Born Pretty Store goodies in the post, which some of you may have seen on Instagram. As soon as I opened the parcel I just couldn’t wait to use them, so I decided to try out a variety of looks on the rose nails I had on at the time. I thought it would be a nice change to show you one look but a few different ways to accessorise it. So I hope you like it!

First up is the look alone. For these nails I used 2 True ‘Taylor’* (dark pink) and 2 True ‘Sienna’* (light pink). Which I should have a full review of coming in the next week or so. I also have a tutorial for these nails coming up soon too so keep an eye out for that.


Next up is using these* gorgeous green studs. I can predict that all these gorgeously coloured studs will be used regularly because I’m absolutely in love with them!


The second look is just adding to the previous look. I didn’t want to take off the studs straight away so I decided to add these* gorgeous flowers. They’re not exactly practical but they definitely look great!


The final look is using these* rose studs, if you can call them studs. I was pleasantly surprised to find these (and the previous flowers) were rubbery rather than hard, which certainly makes them more practical as they don’t painfully rub on your skin or catch on things quite as much as they would if they were hard.


There you go! What do you think? Let me know in the comments
Alice

*some of the products in this post were provided to me for review but all opinions are entirely my own

Monday 5 August 2013

Tutorial: Red Gradient Palm Trees

Hey everyone! So, currently I have 10 tutorials lying in my 'things still to post' folder on my computer that I did for Licila.si, because I can't choose which one to post first! Today I decided to just take the plunge with my palm trees design, after asking on Instagram which to start with. A tutorial was highly requested in my original post, so I hope I've made it clear enough. I previously hated tutorials due to the time they took to perfect in photographing and in editing, but since I decided that I didn't have to do a full hand for each step it's now a lot easier to photograph and to edit. So let me know if there are any tutorials you'd like to see specifically. Anyway, the tutorial will be after the jump!


You will need:
  • Clinique 70 Degrees and Sunny (or a yellow nail varnish)
  • Barry M – Passion Fruit (or a red nail varnish)
  • Make up sponge
  • Barry M – Black nail art penor another nail art pen
  • Seche Vite (or a fast-drying top coat)


Step 1: Paint your nails with a base of yellow


 Step 2: Paint both colours overlapping on to a piece of paper. Push your sponge in, and then dab that on to your nail. Once done, clean up around your nail with acetone and cotton buds, and apply a fast-drying topcoat like Seche Vite to smooth out your design


  Step 3: Using the black Barry M nail art pen, draw around the base of your nail like this


 Step 4: Draw the outline of where you want your tree to be, again using the pen


 Step 5: Draw on the leaves coming out from branches, again using the Barry M black nail art pen


 Step 6: Finish off with a topcoat to seal in your design. You can also add a matte topcoat afterwards if you'd like to make it more like my original design.

What do you think? Let me know in the comments!
Alice

Sunday 4 August 2013

Something a little different

Hey everyone! I know you're probably expecting the last of my 'Which is Best?' series today, which would have been about matte top coats. I shall be doing it next weekend instead due to some technical difficulties so keep an eye out for that. Today's post is a little different. As you will see, these are not my nails. I have a tonne of posts lined up for you, so don't panic that I'm not doing my nails or anything like that. My lovely friend Natalie wanted to make an appearance on my blog, and help me out with some of my product reviews. You may recognise her nails from my YouTube tutorials, as she is often my guinea pig. It's a bit like a guest post, except I actually did the nails!


To do this design I used Born Pretty Store's Sweet Color nail polish in Shade #105* on the alternate nails. This was 2 easy coats. Unlike the picture on their website shows, this is actually a very opaque creme polish, rather than a translucent one. 


  Once that was dry I applied some Fake Tattoos* (see picture above) to the nail. I've never used nail tattoos before and I'm surprised at how simple they are to apply. All you have to do is cut, peel and apply some wet kitchen roll to your nail to transfer the design and you're done! I used the hearts and the bows from the bottom middle set. 


I then applied Elegant Touch Patterned Colour Wash Wraps* (see picture above) to the remaining nails. This was my first experience using nail wraps and I was expecting to absolutely hate it. I've actually had this wraps for months because I was so wary of using them. Luckily I was proved completely and utterly wrong. These are super easy to apply, super easy to remove creases from, and they last well too. I would 100% recommend these for those of you who want nail art but don't have the time or confidence to do it yourself. You can get them here for just £5!


Finally, once I was done applying the nail wraps, I applied these gorgeous peach studs* (#5) from Born Pretty Store. They've recently just got in a tonne of new coloured studs and I ordered pretty much all of them. They're just so irresistible! And they definitely lived up to expectations. These are not only a brilliant size but also the colour doesn't come out when you apply topcoat as is often the case with coloured studs.  


What do you think? I hope you didn't mind seeing some different nails today!
If you fancy some of the Born Pretty Store products, don't forget to use my code KHL91 for 10% off
Alice

*Some of the products in this post were provided to me for review but the opinions provided are entirely my own and were not influenced in any way.

Thursday 1 August 2013

Nail Girls Nail Art and GIVEAWAY

Hey everyone! Today I have a post using some nail polishes from 'Nail Girls', which is a fantastic brand that I hadn't previously heard of but I'm so glad they contacted me because I really truly loved these polishes. I was provided with 2 polishes to create some nail art with for their blogger of the month post. Alongside this they've also given YOU the opportunity to win 2 polishes of your choice from their website, as well as a topcoat. This is incredibly generous of them and I'm so happy they're willing to do this for you all. The giveaway and giveaway rules will be at the end of the post for those of you who don't want to see my AMAZING nail art ;)


I didn't want to distract too much from the two colours I was given, so I thought using black would be a good way of avoiding that. It's quite difficult to create anything worthwhile out of just 2 colours so black was a great addition to this design. For the squares I used this tutorial by PackaPunchPolish. 


The colours I chose were Pink No.15*, which is the most unique pink I've ever seen, but the camera really doesn't do it justice, and Blue No. 3*, probably the lightest blue in my collection and I could have easily got away with 2 coats but I chose to do 3 just in case. They're both very creamy and opaque, which is always a plus. Pink No. 15 needed 2 coats.


Now for the bit I'm sure you've all been waiting for, the GIVEAWAY!


First off, the boring part, the rules:
  • You must be 18 or over or have parents permission in order to enter
  • The winner will be chosen randomly using Rafflecopter, which uses random.org
  • Whoever wins must respond within 48 hours of me choosing, otherwise I will pick another winner
  • The closing date is the 15th August at 12am 
  • This giveaway is open to the UK only due to recent regulations on shipping polish (sorry international girls, but I have something great coming up for you soon!)

a Rafflecopter giveaway
For those of you who don't win, the lovely Alice from Nail Girls has given me a code for you all to use in order to get 30% off orders over £15 on their website before the 31st August, the code is ONENAIL30

Good look everyone! 
Alice

P.S if you have a minute I would appreciate it so so much if you could vote for me for 'best new beauty blog' in the Cosmopolitan Blog Awards here

*some of the products in this post were provided to me for review but my opinions are entirely my own and were not influenced in any way